Phone or desktop — find your products, build a sale and keep every installed register app within reach.
On your phone.
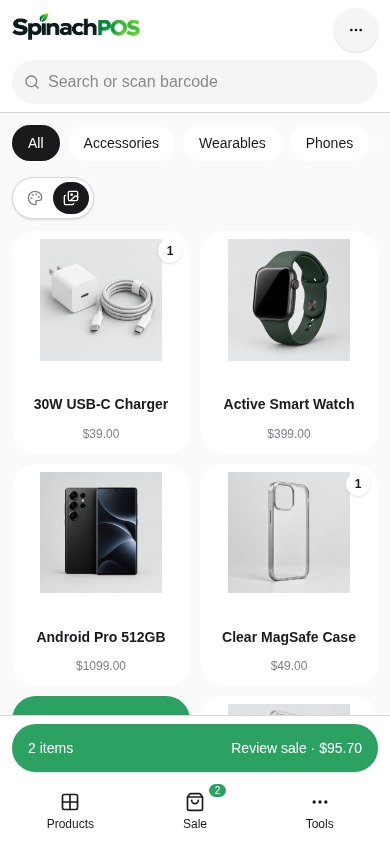
Products first. A full-screen sale when you need it. Tools at the bottom or behind the three dots.
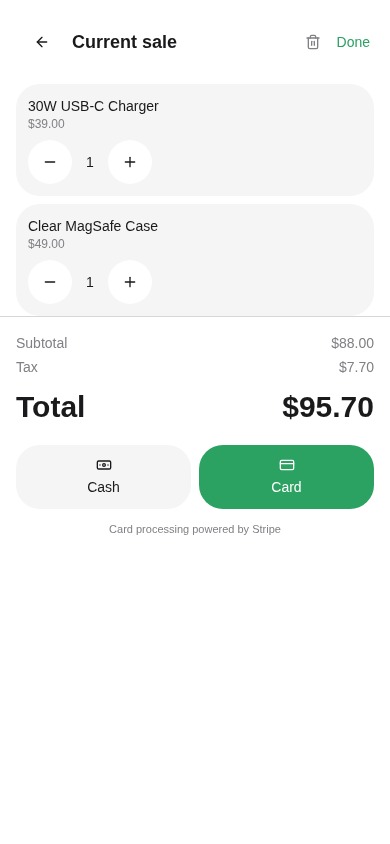
Products · Review sale · Bottom navigationCurrent sale · Quantities · Payment
1. Build and review a sale
Search or tap an item. Use Menu / Retail if your business sells both. Retail hides dine-in, takeout, delivery, Hold, kitchen Send and tip controls; Menu keeps restaurant ordering available. Tap Sale or the green Review sale button to see the full order. Change quantities, add a customer, apply discounts or coupons, and choose payment. The back arrow returns to products without losing the sale.
2. Seat guests and take an order
With Restaurant & Tables active, tap Tables at the bottom. Select a table to seat guests, assign a waiter, or open an existing check. New items can be sent to the kitchen from the sale. Hold keeps a course waiting; open Tools → Held to fire it later.
3. Recall, print and cash out
In restaurant mode, tap Orders to recall a sent order. Tables and tabs keep their existing checks, printing and split options. Open the sale to print a guest check before payment, or take payment later. Evenly split printed checks show each guest’s share; individual even-share payments are not supported yet.
4. Reach every enabled tool
Installed register apps, including Gift Cards, Loyalty and QuickGPT, appear in the app bar below search on phones too. Swipe the bar for more apps. Businesses selling both have a separate Menu / Retail selector above categories. Tap Tools or the three dots for receipts, refunds, cashier switching, clock-in, pickup alerts, held courses, drawer, closeout and Back office. Back-office-only apps stay in Back office and My apps. Access depends on your business type, enabled apps and permissions.
At the counter.
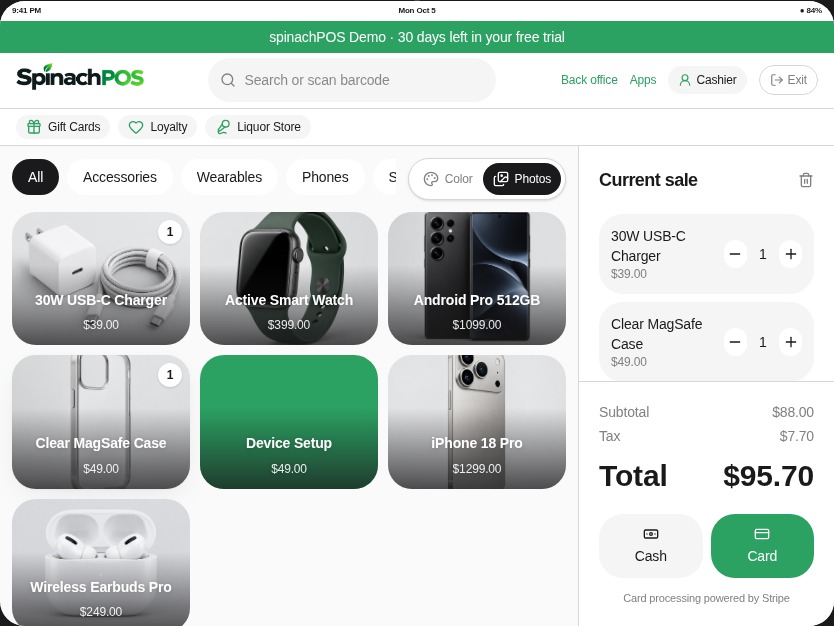
On desktop and tablets, products and the current sale stay together in one workspace.
Desktop register · Products and current sale
Screenshots show the demo register. Your menu, installed apps and available controls depend on your store, permissions and business type.
1. Products and sale, side by side
Search or scan a barcode at the top, choose a category, then click a product to add it. Your current sale stays on the right. Use the − and + controls to change quantities. Choose Cash or Card below the total; your signed-in register also includes customer, discount, coupon and split-payment options when available.
2. Apps and register controls
Use the app bar below the header for installed register apps such as Gift Cards, Loyalty, Layaway and QuickGPT. The top toolbar provides register actions, with additional actions in the three-dot menu. Open Back office for settings, reports and apps that do not have a checkout action.
3. Restaurant checks
If your business sells both, select Menu for restaurant orders or Retail for merchandise. With Restaurant & Tables active, use Tables in the top toolbar to seat guests or open a check. Use Orders to recall sent orders. Add items on the left and use Send & save or Send new items in the sale. Hold keeps selected items waiting until you fire them.
4. Print, split and finish
Open a restaurant check and choose Print check or Reprint check before payment. Print the whole check, by guest, or split evenly. By-guest checks can be paid separately; evenly split printed shares do not yet support individual even-share payments. Use the register tools to find receipts, reprint, refund or close the register.
Offline mode supports eligible cash sales only. Card charging and printer behavior still depend on your connected hardware and services.